Departures(SIDs) -
Download zip file of this lesson here (400k)Let’s talk a little about what we’re going to need to do before departing.First, as always, would be a check of the weather. For the sake of simplicity, I’m going to use rules pertaining to FAR part 91 operations(private aircraft and operators). Airlines, charter, cargo, etc. have to follow specific guidelines, but we are allowed to takeoff in any weather we choose. So, if the ceiling is down to the ground and visibility is zero and all you can see is the runway centerline to maintain directional guidance during the takeoff role, that’s fine, you can takeoff anyway. Not a really good idea however. What happens if you have an emergency after takeoff and need to come back? Uh-oh, now the weather is below minimums for the approach and you’re on your way to somewhere with better weather(if you can keep the plane flying that long). So, the general rule is don’t takeoff unless you’ve at least got the minimums for the approach back into the airport. At the bottom of your approach chart airport diagrams, you’ll probably see takeoff minimums printed, but those don’t apply to you. Also at the bottom of some approach plate airport diagrams you’ll see "IFR Departure Procedure:" These aren’t explicit instructions for how to get where you’re going, they’re instructions on how to maintain obstruction clearance at airports where there are obstacles nearby. For instance, the IFR Departure Procedure for Ft. Pierce, FLA says "Rwy 14 & 32 climb rwy heading to 600ft before turning right" This is just telling you not to make an early turn out so you don’t run into something. Also, for every IFR flight, we’re going to have to file a flight plan. We’ll discuss how to file a flight plan in the final lesson when we work up to an entire flight. From our flight plan, we will receive our clearance. Our clearance, in part, will tell us how we are to depart. At large airports, there are frequently Standard Instrument Departures(SIDs) which provide explicit instructions on how to make the transition from takeoff into the enroute structure. Because of the high volume of traffic in or around these airports, a standard procedure is needed to keep traffic organized. At smaller airports, we may not receive explicit instructions on how to depart. Instead, ATC may instruct us however they best see fit in order to control traffic in the area. So, having said that, let’s take a look at a segment of a sample flight and see how a departure would go...
Since we looked at enroute charts previously, you will remember our discussion of V3, a portion of which runs between the Vero Beach VOR(VRB) and the Melbourne VOR(MLB). So, let’s say that we’re going to depart Vero Beach on a flight to Melbourne and we’ve filed V3 as our route of flight at 3000ft. If you look on the enroute chart, you’ll see that the airport is approximately 3.5nm east of the VOR. If the airway starts at the VOR, how are we going to get there from the airport? Well, first let’s look at the clearance we’ll get if we file V3. We would pick up our clearance while still on the ground, just like in X-Plane. The clearance you will get in this case would be exactly like this: "N9246F cleared to the Melbourne International airport as filed(V3). Climb and maintain 2000, expect 3000 ten minutes after departure. Departure will be on 132.25. Squawk 4352". What that means to you is that you have been CLEARED(read: you may proceed all the way to) the Melbourne International airport. This means that you are cleared all the way to touchdown at Melbourne. There are times when you will only be cleared to an intermediate fix, but we’ll save that for later. As filed means whatever you put on your flight plan(V3) is OK with ATC. Many times you will NOT get what you filed. You are then instructed to climb and maintain 2000ft and told that you may EXPECT 3000ft ten minutes after departure(read: if you lose communications, assume that you will have been cleared to 3000ft and then climb to it ten minutes after departing). You then get your departure frequency and squawk code. But we still haven’t been told how to get to V3 right? Do not fear, let’s taxi out and see what the tower has to say. When we’re ready to takeoff(let’s say we’re using runway 11R), we’d contact the tower and they’d say to us "N9246F fly runway heading. Cleared for takeoff runway 11R". So, we taxi onto the runway and blast off into the soup, climbing to 2000ft and flying runway heading(110). We’re climbing out and at about 500ft or so, the tower calls us up and says "9246F contact departure". Well, here’s where things start changing....Since we got the departure freq. in our clearance, we just flip to the proper frequency and say "Miami, 9246F is 500 for 2000 runway heading". Now they know where we’re at and they know that we know we’re supposed to stop at 2000ft. They would then come back and say "9246F Miami Center radar contact climb and maintain 3000". Now they’ve got us on radar and they’ve cleared us to climb to our cruise altitude of 3000ft. All this time, we’ve been flying along at runway heading and climbing towards 3000ft. Shortly after this, Center would come back and say something like "9246F turn left heading 300 vectors to join V3". Now we finally have something to work with. So, we turn left to a heading of 300 and if you look at the enroute chart, sure enough, a heading of 300 should cause us to intercept V3 somwhere between VRBand MLB. So, we cruise along at this heading, leveling off at 3000ft, and tuning our HSI to intercept V3(This should really be done before takeoff). To do this, we’d tune in the freq. for VRB(117.3) and turning the needle until the head points to 347 degrees and the direction indicator is showing FROM(pointing away from the head). The needle should then be deflected to the left side of the head indicating that our course is to the left side of center(our airplane is always in the center of the HSI). So, we’d have to fly one of the headings on the left side of the head to reach our course and sure enough, 300 is to the left side.
Departure "A" Picture
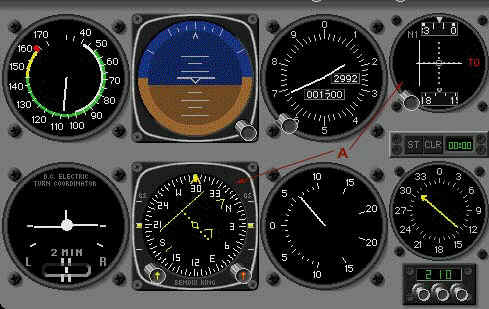
We would then cruise along until the needle centers, which means we are on course and then turn to intercept it. The needle should remain centered and we should be flying close to the same heading(perhaps a couple of degrees off for wind correction).
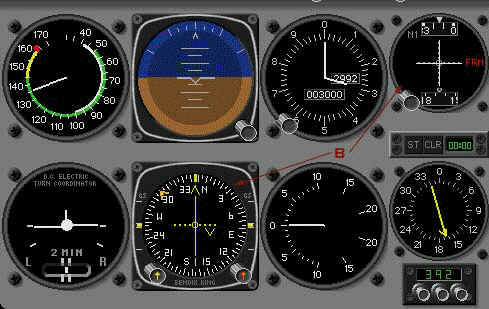
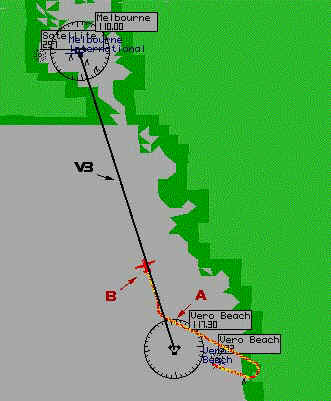
So there it is, we’ve successfully departed Vero Beach and established ourselves on course!
OK, now that we’ve done that, let’s now depart out of a busier area, Ft. Lauderdale-Hollywood International. Before we begin, let me say a few things about SIDs. First, you don’t have to have the SID chart to use one. If there is one available and you would like to use it, you can tell ATC and they will read off to you the textual description which contains all of the instructions. The graphic is only for situational awareness, so you’re not required to have it. Second, you are NOT required to file or use a SID just because one is available. If you choose not to use one, simply put "NO SID" in the remarks section of your flight plan. Having said that, guess what, if there’s a SID available, you’re going to fly it whether you like it or not. The only way you can get around it is if you can’t climb at least 200ft per NM which is a standard requirement for SIDs or if you don’t have the necessary equipment. Why is this? Well, SIDs were designs for a reason and ATC wants to make their job as easy as possible, so they’re not going to let you just fly in and out of the airspace wherever you like. So, let’s say that you tell ATC that you don’t want to use a SID. They’ll come back to you and say "No SID huh? OK, cleared to ... via a REVISED routing..." and then they’ll proceed to read off exactly what it says on the SID chart. So, you thought you got away with it by filing your own routing, but ATC has the authority to change your routing to fit in with traffic flow, so they’re going to make sure you go where they want you to. OK, let’s get to the flying.
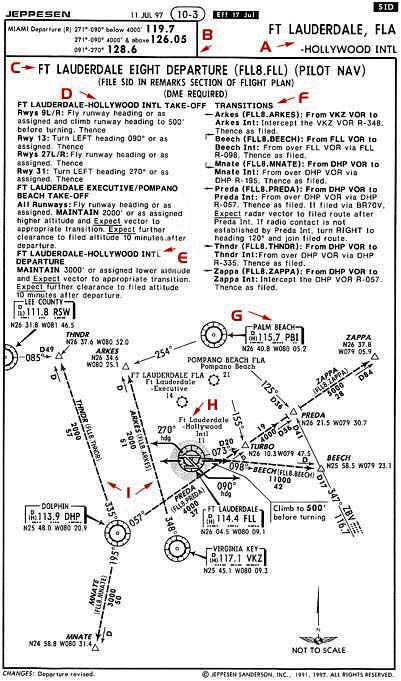
Here you see the chart for the "Ft. Lauderdale Eight Departure". "A" shows us the chart identifier, letting us know it’s a chart for Ft. Lauderdale, FLA pertaining to Hollywood INTL. Like our Approach plates, "B" is the comunications box showing us applicable frequencies. "C" tell us the identifier of the procedure. At the end, you’ll see the "(FLL8.FLL)". This is the actual ID for ATC to program in their computer when you file your flight plan. Next to that, you see "(PILOT NAV)". This tells you that you will have to follow the instructions and you’re responsible for the navigation. Some SIDs are "(VECTOR)" procedures where ATC just gives you a vector out to your course as filed. Notice below is says "DME Required". Make sure you read these or you won’t be able to fly the SID and you’ll have to notify ATC accordingly. "D" is the beginning of the textual instructions. Read it just like a book and follow the parts that apply to you. The first part says" Ft Lauderdale-Hollywood Intl Take-off" which means this section will tell us what to do on takeoff. Let’s say we’re departing Rwy 27L. The first section says "Rwys 9L/R". Since we’re not using this runway, we skip down to where is says "Rwys 27L/R" and read that we’re supposed to fly runway heading or as assigned "Thence". When you see "Thence", that means move on to the next section. Below that you’ll see takeoff instructions for Ft. Lauderdal Executive and Pompano Bach, but since we’re not operating from those airports, we skip over those and move on to "E". "E" tells us our departure procedure. It tells us to climb and maintain 3000ft or assigned lower and EXPECT a vector to the appropriate transition and EXPECT clearance to our filed altitude. Now we move on to "F", which is "Transitions". Transitions are how we get from takeoff into the enroute part of our flight. Since you can’t see the applicable enroute chart here, you have to work with me a little bit. Let’s say that we were on our way to Tampa Intl, which is northwest of Ft. Lauderdale. So, we want to use the "THNDR" transition to take us up to V157 towards Tampa. So, under "Transitions" we would go down until we reached "THNDR" and read what it says. It tells us that the THNDR transition goes from DHP VOR to THNDR intersection and to fly it, we would, from over DHP VOR, proceed via radial 335 until reaching THNDR. Now, above in "E", it told us to expect a vector to our appropriate transition, so we shouldn’t have to fly to the DHP VOR and then back track up radial 335. However, if we lost communications, we would have to do that because ATC wouldn’t be able to give us vectors. Now, let’s move down to the pictorial overview for a better idea of what’s going on. "G" illustrates a VOR, just like on enroute and appraoch plates. "H" is the airport identifier and you can see the dark black lines with arrows illustrating the takeoff instructions we saw in section "D". "I" points to a couple of transitions. You’ll see that the one on the left is the THNDR transition. Below the transition ID, you’ll see "2000" which, like our enroute chart, is our MEA. Below that, you see "57", which is the DME distance from DHP VOR to THNDR intersection. Once you reach THNDR, you would proceed on course as you filed. So, you can see how this saves everyone time. You know exaclty what to expect and ATC knows what to give you, so communication and confusion is cut down. So, let’s fly it. Our clearance would say "...Cleared Ft. Lauderdale Eight then as filed..." Like I said, we’ll depart runway 27L on runway heading, climbing to 3000ft. After being switched to departure, we would receive our vector to intercept our course.
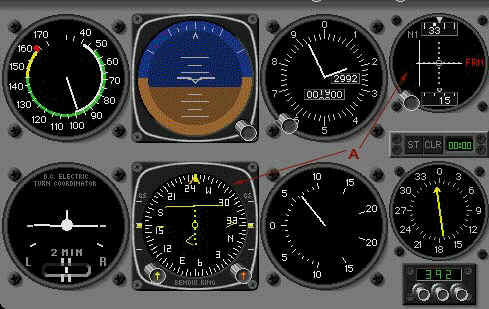
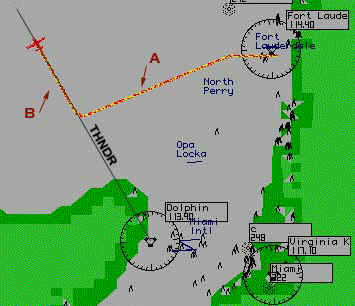
We would then fly along until we intercepted the 335 radial FROM DHP and then turn on course until we reach THNDR.
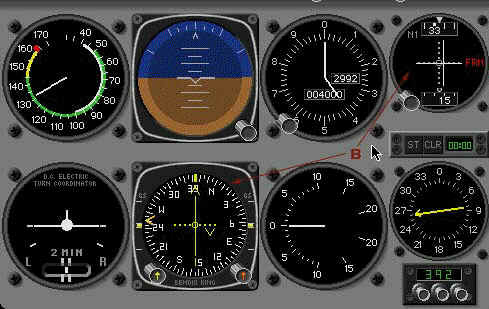
At that point, we’ve completed the SID and we would proceed along our route as filed. There you go!
