Arrivals(STARs) -
Download zip file of this lesson here (400k)So we've managed to get ourselves airborne and we've
learned how to find our way around the airways systems, so now it's time to make our
arrival into the airport area. Now, we're not talking about the actual approach to the
airport, we're talking about arriving into the airport area in preparation for the
approach. Normally the arrival process is simple, but before we get into the specifics,
let's talk about what we want to do in preparation. Just like departure, one of the keys
to a successful and efficient arrival is being prepared by getting the current information
from the Automated Terminal Information Service(ATIS). By obtaining the current ATIS, we
will know what the weather is at the airport and we will know which approach is in use.
Having this done, we can contact Approach control when advised and let them know that we
have the ATIS, avoiding having to switch frequencies later. In real life, you DO NOT want
to leave Approach once you've contacted them. The other major consideration to think about
is the descent. Once we establish a descent, it's preferable not to have to level off and
then begin again. Now, once when you are at your cruising altitude, you're required to
maintain it unless receiving a clearance to a new altitude. Normally when you're
approaching the general area, ATC will issue you a clearance to descend just like in
X-Plane. Once that clearance is received, you are expected to begin your descent
immediately. You may also receive a clearance to descend "at pilot's discretion"
meaning you are cleared to that lower altitude, but it's up to you to decide when to start
the descent. Let's work with the usual "descend and maintain" clearance though.
In order to plan your descent, you'll need to know how far you have to travel to where
you're going and what your groundspeed is. Let's say that we're cruising at 10,000ft and
doing 120kts over the ground. ATC comes on and says "9246F descend and maintain
2000". Our response to that would be "46F's out of 10 for 2". Now, let's
say we're 20NM from the Initial Approach Fix(IAF) for the approach we plan to execute upon
arrival. So, if we're doing 120kts, it's going to take us 10 minutes to reach the IAF. We
have to descend 8000ft in that time, so we're going to need to make our descent at
800ft/min. Keep in mind that if you leave the power set at cruise and just lower the nose
to descend, you're airpseed(and correspondingly groundspeed) will increase. So, make sure
you take this into account when making a descent. Commercial operators are always
concerned about time(which is equal to money of course), so you should plan to descend as
fast as is feasible. Now, onto a little aside about that...We know that we cannot exceed
250kts indicated below 10,000ft. When I was getting my Private license back in Santa
Barbara, CA, I used to visit the tower frequently because we had radar approach control.
Aircraft arriving from the northwest would usually get a clearance to cross the Gaviota
VOR(GVO) at some particular altitude and then descend into the Santa Barbara area after
clearing the mountains. Almost always, we would be landing to the west, so aircraft would
have to come around to the other side of the airport to land. Now, the airlines don't want
to take any more time then they have to, so they'd come over the VOR still in excess of
300kts and just coast down to the airport area. You could see them on the radar indicating
like 310kts or so descending through 5000ft and Approach would say "United 463,
what's your airspeed?" to which they would invariably reply "463's showing
250". Approach wouldn't make a big deal of it unless it was going to cause a traffic
conflict. So, you can get away with it, but you didn't hear it from me. So, now that we've
talked a little bit about descent planning, let's talk about procedures...
A normal arrival isn't too terribly exciting if you're going into an
airport without a STAR. Let's go back to our enroute chart from the second lesson and
pretend we've departed Vero Beach and we're cruising along on V3 at 4000ft heading for
Melbourne. Now, the Melbourne VOR is located on the airport, so flying V3 to MLB will take
us right to the airport. Now, let's look at a couple of options. First, let's say that we
want to do the full(the entire procedure without radar vectors) VOR 9R approach at
Melbourne. Now, the IAF for the full VOR approach is the MLB VOR, so just flying V3 right
to the VOR will take us right into the approach. So, we're flying along V3 at 4000ft,
we've been handed off to Patrick Approach(Patrick AFB handles radar coverage of MLB), and
we've got the ATIS. At that point, we'd want to tell Approach of our intentions by saying
"Patrick 9246F would like the full VOR 9R Melbourne". When we near the area,
Patrick would come back and say "9246F descend and maintain 2000ft, cleared VOR 9R
approach". Usually you'll be cleared down to whatever altitude is the entry altitude
for the approach. So, now we're cleared down 2000ft and we're also cleared for the
approach, meaning that once we reach the VOR, we may then execute the approach as charted,
changing altitudes and headings as necessary without receiving clearance. So, that's
really all there is to a typical approach. Just get ATIS, contact approach when
instructed, let them know what you want to do, and make your descent as instructed. A note
about full approaches: unless you ask for one, you'll almost never get it. You'll almost
always get radar vectors because it's more efficient for you and for ATC and allows them
more control of traffic.
Now, just like SIDs, the country's busier airports are normally served
by one or more Standard Terminal Arrival Routes(STARs). Like SIDs, these are plotted
procedures that you may file or may ask not to receive, but also like STARs, you will
almost always be forced to comply to facilitate traffic control. STARs serve to
"funnel" traffic through a particular area, freeing up other space for
departures and other operations. Let's take a look below at a STAR...
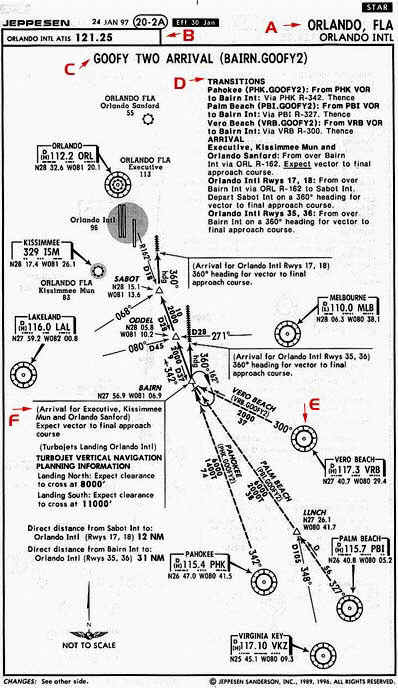
"A" tells us that this STAR serves the Orlando, FLA area, the Orlando International airport being the primary airport. Keep in mind that, like SIDs, STARs frequently will serve all of the areas in a particular area, not just the primary airport, so if you’re travelling to a small airport which is in the same vicinity as a large on, you may want to take a look at the STARs for that airport because you may end up being asked to fly it. "B" is our communications box, telling us the ATIS frequency so that we can be prepared. "C" is the procedure identifier, this one being the Goofy Two Arrival(yes, it’s called Goofy because it’s near DisneyWorld. This is the FAA’s idea of a sense of humor). It’s ATC computer identifier is (BAIRN.GOOFY2). BAIRN is included in the ID becuase it is the intersection that serves as the "funnel" point, which you’ll soon see. "D" is our textual description of how to proceed. Simply find which transition you will be using(ATC will usually say in your intial clearance(ie "9246F is cleared....Goofy Two Arrival, Vero Beach transition")). So, let’s say we are going to be using the Vero Beach transition. We move down the instructions until we see "Vero Beach(VRB.GOOFY2)" and it tells us that this transition extends from VRB VOR to Bairn Int. In order to fly this, we would proceed via the VRB radial 300. Notice there is no mention of altitude here, it will be dictated by ATC’s discretion at the time. Below that we see "Arrivals" which is our instructions on what to do once we’ve completed the transition. You’ll see that the first part says "Executive, Kissimmee Mun, and Orlando Sanford". These are the instructions for the other airports in the area of Orlando. Let’s say that we are going to land Rwy 18R at Orlando Intl. We would then move down and find the part which says "Orlando Intl Rwys 17,18" and it tells us that from over Bairn Int, we will fly via the ORL radial 162(make sure you tune 342 TO because you’re flying to the VOR instead of away like from VRB to Bairn(see illustration below)) to Sabot Int. we will then depart Sabot Int on a heading of 360 for a vector to the final approach course. Now let’s move down to the pictoral display. "E", just like SIDs, enroute, and approach charts, illustrates our VORs. "F" gives us a repeat of the instructions from above. This arrow points to BAIRN intersection and tell us if we’re landing at an airport other than International, we’ll be expecting a vector to the final approach course. You’ll notice that there is an oval "racetrack" pattern depicted at BAIRN Intersection. This indicates a hold. So, you can expect that, if it’s a busy day in Orlando, you may find yourself stacked up over BAIRN Intersection waiting to be cleared for the approach. Also here, you’ll see some special information for turbojet aircraft operating at high altitudes called "Vertical Navigation Planning". Since we’re planning on landing south on Rwy 18R, it tells us that we should expect to cross BAIRN intersection at 11000ft. Knowing that, we can plan our descent from the Flight Levels better. On the right side of the chart, you’ll see two more bracketed areas for other instructions. Also on the chart, you’ll see other VORs which aren’t part of the actual procedure. However, they have radials which can be used to define the intersections. You can see that the Lakeland VOR radial 080 can be used to define ODDEL intersection in conjuntion with the ORL radial 162. If you have DME, you don’t need that intersecting radial because we can see that ODDEL is 28NM DME from ORL. Got all that? Good, let’s go flying...
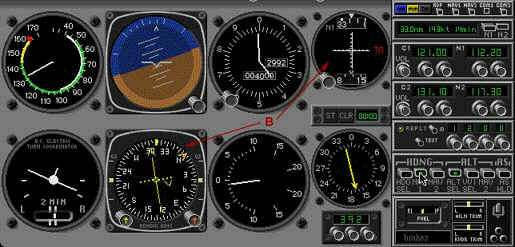
Let’s depart Vero Beach and proceed directly to the VRB VOR, climbing to 6000ft. From there, we’ll proceed via radial 300 along the Vero Beach transition. I’ve got NAV2 set to the VRB VOR r-300 FROM and I’ve got NAV1 set to the ORL VOR r-342 TO(recipricol of r-162 TO). NAV2 is centered because we’re tracking it and NAV1 is deflected to the left indicating that we would need to fly a heading left of 342 to intercept that course, which we’re doing. I’ve got DME set to NAV2 to track my distance from VRB. At this point, we would have already been "...cleared Goofy Two Arrival, Vero Beach transition".

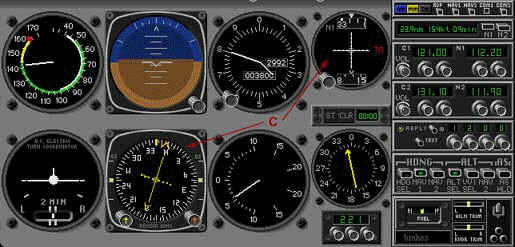
Now NAV1 centers as we pass over BARIN and I start my turn to fly inbound on the ORL r-162, continuing to use NAV1 to track to ORL.
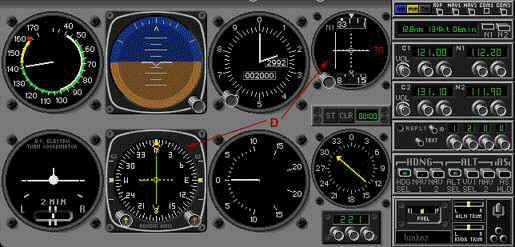
Since I’m going to be landing south on Rwy 18R at Orlando International, I’m going to proceed to SABOT intersection, which is DME 18 from ORL. I’ve got NAV1 still tuned to ORL and I’m continuing to track towards SABOT. I’ve got the DME set to NAV1 now so I know when I’ve reached SABOT, which is 18DME. I’m also starting a descent to 2000ft, simulating that ATC had instructed me to do so. I’ve set NAV2 to the inbound course for the ILS 18R at Orlando International
Upon crossing SABOT, proceed via heading 360 and wait for a vector to the final approach course. I’ve got NAV2 set to the ILS course.

In this case, I’ve assumed that I’ve been given box vectors(90 degrees turns) to the final approach course to ILS 18R and landed safely("Andrew Ayers, you just flew the ILS 18R at Orlando, what’re you going to do now?" "I’m going to Disneyland!!!") So there you have it, a successful STAR! Next lesson, the stuff you’ve all been waiting for, it’s time to fly some approaches!