Approach Plates - Download zip file of lesson here (400k)
To the right, you’ll see a Jeppesen Approach plate for one of the approaches which serve Key West, Florida. Though each plate contains specific information for each approach, they are all laid out in the same format, so what you will see here will be the same things you will see on other plates. I’ll be using Jeppesen for my examples since I have current charts. NOS are just as easy to use and use nearly all the same symbols, so if you’ve purchased some NOS charts, you won’t have any problems transferring this information. This lesson is just to explain what the charts are telling you, not how to actually fly an approach with them. That will be covered in the "Approach" lessons. Let’s start at the top and work our way down...
The top section of the approach plate is called the header. "A" shows us the chart identifier. We see that is the chart for "Key West, FLA", the airport being served is "Key West INTL". This is important for cities with several airports, make sure you’ve got the right plate in front of you. Next, we see that this is the chart for the "VOR or GPS-B" approach. This tells us a number of things. First, we now know that this approach is based on the use of either the VOR or the GPS. Second, we see that instead of indicating what runway the approach serves(ie "VOR 9"), it just says "B". If an approach identifier ends in an alphabetical suffix, that means that the final approach course(the course we will fly on the final part of the approach) is not aligned within 30 degrees of the runway centerline. Because of this, the approach doesn’t serve one runway in particular. Below the identifier, we see the VOR frequency and identifier. Since the VOR is the primary navaid for this approach, it’s information is printed in the header. It’s the same for ILS, NDB, etc. Below that, you’ll see the airport identifier and sea level altitude. "B" shows us our Minimum Safe Altitudes (MSA).
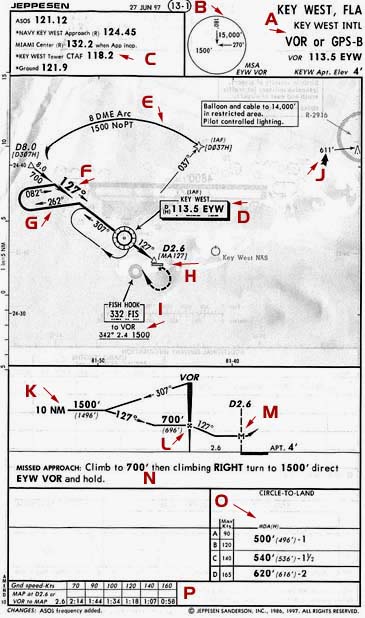
Near the bottom, we see "MSA EYW VOR". This tells us the MSA circle is centered around the Key West VOR. The circle represents a 25NM radius area allowing 1,000ft of obstruction clearance. From this, we can see that anywhere from east through south and west to north, we can descend to 1500ft and still have assured obstruction clearance. In the northeast quadrant, we can’t descend below 15,000ft. This is primarily used during missed approach procedures to maintain safety while preparing for another approach. "C" is our communications box, giving us all the pertinent frequencies. Since we don’t really have to tune correct frequencies in FS98, we’ll move on...
Next we come to what is called the "Plan View" which gives us an overhead look at our approach. "D" points to the ID box for the primary navaid, the Key West VOR. This tells us all the pertinent information about the VOR, its freq., its Morse code ID, the "D" indicates it has DME and the (H) indicates that it’s a high VOR(read your AIM). Above the identifier, we see the letters "(IAF)". This stands for Initial Approach Fix. In other words, this is where the approach starts. If we were going to fly the full approach, this is where we would start. Some approaches have more than one IAF. For example, if you look just up above "D" slightly, you’ll see a GPS fix called [D037H], which is also an IAF. "E" points to what is called a "DME Arc". An Arc is another procedure we can use to fly to an approach course, one we will discuss in detail in a later lesson. Not all approaches have Arcs. "F" indicates the inbound approach course. This indicates that we will be flying along the 127 degree radial TO the Key West VOR when we’re inbound on the approach. "G" illustrates what is called the procedure turn. If we start the approach at the VOR, we have to fly out away from it and then come back in to complete the approach. To do this, we have to have a way to turn around safely. The procedure turn shows us headings to fly while making our course reversal. We’ll talk in detail about how to fly them when we get into approaches. "H" shows us where the airport is located on the approach. The triangle represents the missed approach point, showing that it’s at a DME distance of 2.6 or at the GPS waypoint [MA127]. The segmented line curving back towards the VOR represents the missed approach path. "I" points to the ID for the Fish Hook NDB. Since this is not an NDB approach, this navaid is not part of the approach procedure, however, it can give us information about how to orient ourselves with the approach. Below the ID, you will see where it says "to VOR 342? 2.4 1500". This is telling us that from the NDB, we can fly a course of 342? for 2.4NM at 1500ft MSL to reach the IAF. These are called "feeder routes". This is useful for making transitions from enroute to an approach. "J" illustrates an obstruction in the area of the approach, with its MSL altitude printed near it.
The next section is called the "Profile View", which shows us a side view of our approach. You’ll see that in the center of the section is a symbol representing the VOR. Since we found out that the approach starts at the VOR, you’ll see the approach course starting from the top of the VOR symbol, reading the outbound course while descending to an altitude of 1500ft. "K" illustrates the procedure turn, telling us that we must not descend below 1500ft MSL(we may stay higher if we like) until we’ve completed it. At that point you see the inbound course as we head back to the VOR, not descending below 700ft MSL. As we pass the VOR again, you’ll see what looks like an "x". It is a "Maltese Cross" and indicates the Final Approach Fix(FAF). This indicates that we’re about to start the final segment of the approach. At this point, we’d descend to what is called out Minimum Descent Altitude(MDA) until we see the airport and land. "M" points to the "M" which represents the Missed Approach Point(MAP). This would be the place where we would initiate a missed approach if we weren’t able to gain visual contact with the runway. We’ll talk more about making that decision when we get to approaches.
So if we have to make a missed approach, what do we do? Well, "N" represents your missed approach procedure. It’s quite simple, just read and do. It’s not uncommon however to get amended missed approach procedures from ATC, so be prepared.
"O" will tell us what our MDA is as mentioned above. First, you’ll notice that there is a lot of blank space to the left of "O". This space would normally contain the straight-in minimums for the approach, but since I said above that because this is the VOR or GPS "B" approach, it’s not aligned to allow straight-in to a particular runway, so we only have "circle-to-land" minimums(see to the right of "O"). The MDAs are listed by aircraft categories. You’ll see "A", "B", etc. along the left-hand side. Aircraft categories are based on approach speed. As you can see, "A" is aircraft with approach speeds 90kts and below, "B" is aircraft with approach speeds 91kts-120kts, etc. So, if you’re coming in at 80kts, your MDA is 500ft MSL. In parenthesis, you’ll see that AGL altitude of 496ft. Also, you’ll see a "1" after the MDA. This indicates the minimum visibility of 1 statute mile. So, what this is telling you is that you may NOT descend below 500ft until you have the runway in sight(it’s more complicated than that, but we’ll save that for approaches) and you may NOT land unless you have a flight visibility of at least 1SM.
Now, as I said above, the MAP is DME 2.6 or a GPS waypoint. But, let’s say you don’t have GPS and you don’t have DME. So, how do you know when you’re at the MAP? Take a look at "P". This table shows you how long it should take you to get to the MAP at various groundspeeds(NOT indicated!). So, if you’ve got a groundspeed of 90kts, start your timer passing the FAF and when it says "1:44", you’re at the MAP. See how easy that is?
So there’s a typical approach plate. As I said, each plate will have it’s own information and may contain items which aren’t covered on this plate. If you have any questions, consult your chart legend or e-mail me. Enjoy!